The post How Switching To WordPress More Than Tripled My Blog Views appeared first on The Blogging Brew.
]]>I made the switch from Blogger to self-hosted WordPress on February 22, 2015, and to be honest, I had no clue what to expect from WordPress in terms of helping my blog grow. I knew it was a more SEO friendly platform, and I purchased the Genesis Framework to boost that even more, so I figured my views would increase at least a bit. But then, after a month of using my new self-hosted blog, my views had doubled. And now, less than a month later, they’ve tripled. And I haven’t noticed any evidence of that trend stopping.
“Views” may not be the right term to use here. I’m actually referring to “sessions”, which is the term Google Analytics defines as
…a group of interactions that take place on your website within a given time frame. For example a single session can contain multiple screen or page views, events, social interactions, and ecommerce transactions.
The other two statistics I’m considering are “users” and “pageviews”, but I’ll get more into those in a Google Analytics 101 post! To make this comparison a little easier, let me give you some backstory on my statistics before I made the switch to WordPress.
Before Switching To WordPress
For the sake of simplicity, I’m comparing the period of time that I’ve been on WordPress (February 22 – April 4) to the period directly before that (January 11 – February 21).
As you can see, my session counts were all over the place. There was an increasing trend, but I’m chalking that up to the fact that I was posting a bit more during this period in an attempt to hype up my switch. My sessions in periods before this were all about the same, with no noticeable increasing trend. Here are a few notable numbers -
Average number of sessions per day: 70 sessions
Minimum sessions for a day: 23
Maximum sessions for a day: 125 (the day before my launch)
Basically, my stats were pretty dang low. I had the occasional spike on days that I posted, but even those weren’t too high. And based on my earlier assumption, had I not been posting more often and hyping up my blog’s switch, they would’ve been a lot lower. You could say I was pretty happy when those numbers skyrocketed after my switch.
After Switching To WordPress
So I’m not quite famous yet (ha), but those numbers still excite me. For the first few weeks of being on WordPress, my sessions averaged out at about 200 a day, which was still above every session count from the previous period. Then, almost exactly a month later, those numbers started increasing, even though I was posting the same amount each week. Here are some extra statistics -
Average number of sessions per day: 370
Minimum sessions for a day: 160
Maximum sessions for a day: 715
Overall, the number of sessions from the previous period increased by a whopping 430%. There are a lot of factors that go into these statistics, so it’s hard to tell what exactly caused this increase. Could social media platforms be sending more readers to my blog? Could my content just be more relevant than before? Basically, I can’t say with 100% confidence that switching to WordPress was the main cause for this increase. I have noticed a big increase in the number of sessions referred by a search engine though, which is a good sign.
Overall Comparison
Gosh do I love Google Analytics.
The numbers are pretty easy to interpret. They’re real, and they’re right there. But there are a few other points this comparison left me with:
Keeping track of your statistics is extremely important if your goal is to grow your blog
It’s hard to start looking at your blog’s growth when you don’t have any history to look at, and that made it hard for me to judge whether switching to WordPress was really what caused my increased views. Had I kept track of exactly how often I was posting before and after, and how my social media followers grew, it would’ve been easier to narrow down the influences.
Watching your statistics can help your blog grow
I’ve been doing some experimenting with post times recently, and it’s interesting to see how the time I publish a post increases the number of views that post gets. I always thought there wouldn’t be enough of a difference, but I was definitely wrong. Now, every time I make a post, I try to publish it at a time I haven’t before, and take note of the number of views that post gets and when it receives the most. I’m hoping this will eventually help me find a “perfect time” for posting and continue to increase my views.
Never trust Blogger statistics
Seriously. Just don’t. I knew this was a bad idea after hearing these words of advice from many other bloggers, but when I finally checked out my Google Analytics statistics, I was still disappointed to see that my actual number of views was almost a quarter of what Blogger had been telling me. So if you haven’t yet, go install Google Analytics on your blog. It’s totally worth it.
If you’ve switched from Blogger to WordPress, did you notice an increase in your views? Or if you’re on Blogger, what are some strategies you use to promote your content and grow your blog?
The post How Switching To WordPress More Than Tripled My Blog Views appeared first on The Blogging Brew.
]]>The post How To Use The Genesis Framework To Your Advantage appeared first on The Blogging Brew.
]]>
So you decided to take the leap and purchase the Genesis Framework. Every other blogger you know has been raving about it, meaning it has to be fantastic, right? You complete the download, install it onto your blog, and…now what?
If you’ve never designed a blog before, or are still dipping your toes into those waters, it can feel a bit overwhelming to make such a big purchase and not really know what to do with it. You might see other blogs claiming to be built off the Genesis Framework and think, how in the world did they go from this to that??? I felt the exact same way for a while, and thought I’d just wasted a huge chunk of money. Let me tell you. That was one of the best investments I’ve made in this blog to date.
Before I get into my tips for using the Genesis Framework, if you’re new to WordPress, I would suggest learning the terminology used throughout this platform. That was probably my biggest issue when I switched over, because every time I read a tutorial, I had to go searching for the definition of words like “child-theme”, “framework”, and “plugin”. Once you have all of that down, working your way around WordPress will be a breeze.
Now, I like to think of the Genesis Framework as my personal assistant. It organizes all of the complicated aspects of WordPress into a simple, easy to use format. Rather than having to learn about every single WordPress feature, I can focus on my job — creating content and designing my blog. Here are a few other ways to get the most out of the Genesis Framework!
Make use of the Genesis widgets
Included with your Genesis Framework purchase are a few widgets that you’ll find to be extremely useful. They’re fairly simple, but that’s what makes them so great. You can display featured posts/pages in your sidebar, provide a subscription sign-up, or even add an image slider! Because they’re from Genesis, they’ll integrate perfectly with your blog, and you don’t have to go searching for plugins to do the same job.
Choose the right child theme
To be honest, any of the child themes are great starting points. As long as you know how to code or have a designer to code a design for you, there’s a good chance you can transform a pre-made theme into exactly what you want. For example, my blog looks nothing like the original child theme I chose!
I suggest looking through each child theme to see what features it already has built in though, especially widget areas and page templates, because those can be hard to code yourself. I loved how my theme came with a home page with a ton of widget areas, so if I ever want to make a shop website, I can simply reuse that theme!
Get to know your CSS stylesheet
My absolute favorite part about the Genesis Framework is that child themes are the default. You automatically receive the Genesis Theme with your purchase, meaning you can start coding a design right away. Whether you choose to stick with that theme or purchase a different one, the first thing you should do is look through the CSS stylesheet (this should be the style.css file within your editor). This is the code that styles your blog, and affects everything from your post title font to the background color of your sidebar. If you know the basic layout of your CSS stylesheet, it’ll make designing your blog a quicker process, and you won’t end up rewriting code that’s already been made.
Make your posts SEO friendly
The Genesis Framework does wonders in the SEO world, and is designed to take advantage of meta tags and page structures. While just having the Genesis Framework installed on your blog can help boost your ratings, you still need to feed it great content and SEO friendly work! That means including keywords in your post titles, creating strong first sentences that give an idea of what your post is about, and writing keyword-rich, lengthy content.
Use the provided resources
With your Genesis purchase comes a fantastic resource – the Studiopress website. The support groups will be your life saver during the implementation and design process, trust me! Every time I ran into a problem, I just searched through that forum and almost every time someone had asked a similar question. If not, you can always make a new thread and wait for a response from some professional Genesis users! Be careful though, they seem to be very particular about how you make your questions, I guess to keep the forum clean and organized. After reading through a few threads, you’ll understand what I mean!
They also have an entire page of tutorials, which are perfect for when you’re first getting started and don’t want to skip a step in the installation process. There are even some more specific tutorials for design elements like sticky navigation bars and adding a Pinterest button! Seriously, you can do everything with Genesis.
Purchasing the Genesis Framework will cost you $59.95, but think of it this way. That’s a one time purchase, meaning you can use this framework on multiple blogs, as many times as you want. And that goes for the themes as well! Have you purchased the Genesis Framework? What are your thoughts? If not, are you considering it?
The post How To Use The Genesis Framework To Your Advantage appeared first on The Blogging Brew.
]]>The post Blogging Is Our Jam – Group Pinterest Board! appeared first on The Blogging Brew.
]]>I’ve been planning on making a post of my newly designed room, but that’s taking a heck of a lot longer than I thought, so instead I’ve gone 5 days postless. I had my little quote series going (kind of) so that should’ve taken up a day, but conveniently, my Photoshop trial expired 2 days after that first post, and I’m not ready to spend all that money for a year’s membership! Instead, I decided to start something that doesn’t require any money/special programs that are totally unaffordable on a college budget—a group Pinterest board for everyone who shares my love of blogging about blogging!
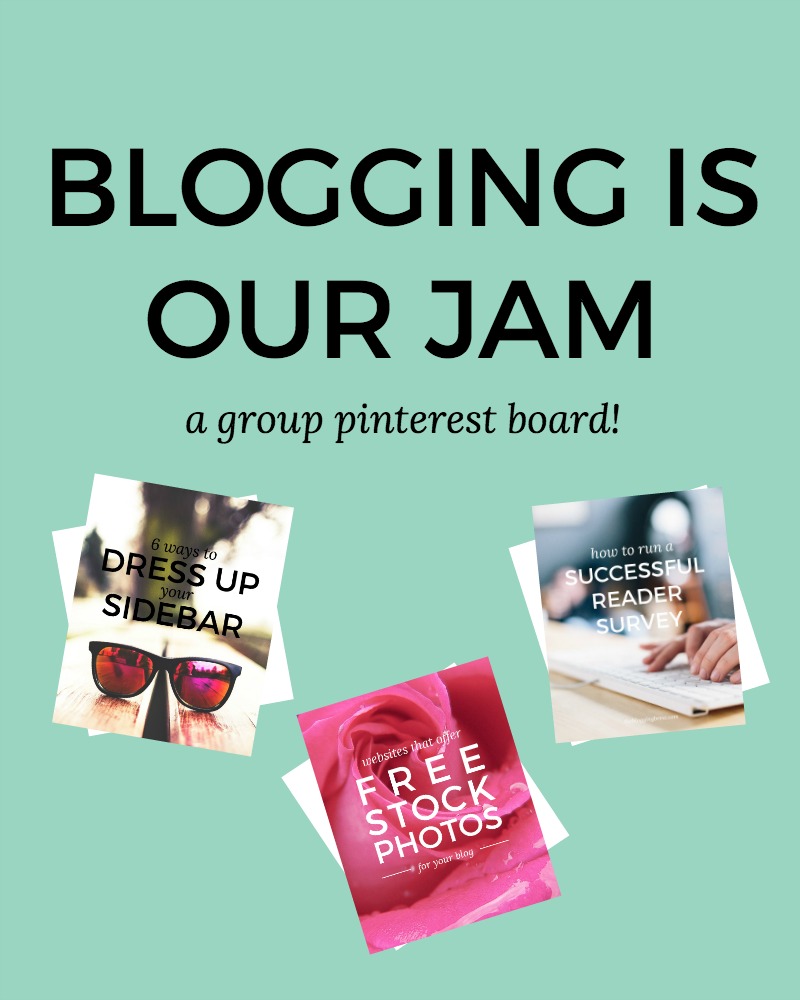
To be honest, this has been a plan of mine since I rebranded to The Blogging Brew. How could I blog about blogging, and not make a Pinterest board about it?? I’m a member of a lot of group Pinterest boards, but a lot of them have strayed from their initial purpose and are filled with random posts that pinners snuck in there. I wanted to create a board that can not only be a resource for bloggers, but a place to get new eyes on any blogging related post they make. The result? The Blogging Is Our Jam group Pinterest board!
I want this board to feel welcoming and fun, but still have some guidelines to keep things in control. Basically, if it’s about blogging (tutorials, design tips, growth inspiration, etc.), it can be pinned! That’s it. Plain and simple.
So of course you want to join in now, right? If this sounds like a board for you, just head over to the board and follow the steps in the description! I didn’t make any pin limit because I figured this is a strict enough niche that spamming it will be pretty hard, so pin away!
The post Blogging Is Our Jam – Group Pinterest Board! appeared first on The Blogging Brew.
]]>The post 6 Ways To Dress Up Your Sidebar appeared first on The Blogging Brew.
]]>I’ll admit, when I was redesigning this blog, I was extremely tempted to opt out of having a sidebar and go for the full width look. After considering the benefits of a sidebar though, I realized how big of a role it plays in grabbing my readers’ attention and making this blog a more fun place! The name sidebar makes it sound like something extra that you don’t really need to pay much attention too, but think about this; that thing is taking up at least 250 pixels of your blog’s width. That’s a lot of space! Your content may be the best anyone’s ever read, but if your sidebar is an eyesore, it might lead them away. Give your sidebar some love, decorate it to your heart’s desire, and use these tips for dressing it up!

Create A Clean “About Me” Snippet
I don’t know about you, but when I visit a blog for the first time, my eyes go straight to this section. Most blogs have one now, and I think it plays a huge part in making the blog feel more personal and “handmade”. I want to know who I’m reading from, and by simply adding a picture and a short preview of who you are, I gain a bit of a connection to you. Be sure to keep it simple though, because too many fonts and colors can make your “above the fold” layout look a little crazy. Besides, why let a huge script font take the focus away from your beautiful headshot?
If you want to take it a step further, add in a link to your “about me” page under your snippet. Leave your readers wanting more, and make it easy to find that!
Add An Instagram & Pinterest Widget
These can really add some life to your sidebar if it’s filled with text and other flat designs. Not only do they allow your readers to learn a little more about you (because my pins definitely say a lot about me), but they may prompt some to head over to your profile and follow you too! I’m currently using the Alpine PhotoTile plugin for my Instagram and Pinterest widgets, but there are a ton of other options out there, including Blogger friendly options like Snapwidget. Play around with the settings and have some fun with these; I love the hover effects, which you can demo on my Instagram widget where I have the “fade out” effect turned on.
Display Your Best Posts
I don’t know why it took me so long to add a widget like this, because my sidebar is essentially free advertisement space for my own posts! Your readers may not want to scroll through your archive to find an interesting post, so by displaying some of your best work in your sidebar, you’re making it easy for them to click over. I’m using the “Top Posts and Pages” widget that’s provided with the Genesis Framework, but I’m pretty sure there are other similar plugins, and for my Blogger readers, creating your own is just as simple! All you need to do is add an HTML widget with images and links from a few posts. This gives you even more control over what you display here.
Design Beautiful Category Buttons
I’ve seen so many creative category buttons recently and I can’t decide which style I like the most! A few of my favorite looks are the minimalist buttons at Love Grows Design, the gradient-style blocks at Oak & Oats, and the handmade vibe of the categories at A Beautiful Mess.
Create Your Own Buttons
Making your own graphics is crucial for tying your brand together, from blog photos to social media covers to business cards. Another place I’ve seen custom graphics lately is in sidebars, like my button for The Collection or the visit prompt for The Nectar Collective’s design page. Like I said earlier, your sidebar is free ad space for your blog, so make the most of it!
Make It Extend Your Brand
My absolute favorite example for this tip is A Beautiful Mess. Their sidebar is just gorgeous, and every part of it has design aspects that complement their brand. I’m not saying every blog needs bright colors and crazy patterns, but do what works for your blog and give that space some lovin’.
Have you stumbled upon any sidebars that you fell in love with? Link to them below!
The post 6 Ways To Dress Up Your Sidebar appeared first on The Blogging Brew.
]]>The post Websites That Offer Free Stock Photos For Your Blog appeared first on The Blogging Brew.
]]>While I would love to say that I’m a professional photographer who takes every photo I use on my blog, that is definitely not the case. So rather than use my horribly amateur iPhone photos, I look to stock photo websites for the majority of my images. Today I want to share my all-time favorite websites for finding beautiful photos, all of which are free!

Unsplash
This was the first stock photo website I discovered, and I’m still raving over it! They’re constantly uploading new photos, so you can grab a new one for every post. They mainly stock landscape/nature photos, but there are occasionally a few wildcards like the one below. And of course, they’re all stunning!
Gratisography
You never know what you’re going to find on this website, which I think is the beauty of it. There’s an edgy tone to all of their photos, so if you’re looking for a little more than trees and oceans, this website is perfect for you! With more variety, you’re also more likely to find something that works well with the topic of your post.
Life Of Pix
This website is very similar to Unsplash, in that it’s mainly stocked with landscape and nature photos. I’m always in love with their new postings, because they’re just gorgeous! There’s definitely a delicate, warm tone to most of their images, which I think works well within the blog world.
Startup Stock Photos
This website is tech photo paradise. Laptops, phones, desk backgrounds, you name it. These photos seem to be prime pickings for bloggers, so I’m sure you’ll find them useful! Like the websites above, this one is in a Tumblr/grid format, so you’ll have to scroll through the archive to find the photo you want, but that also means you might stumble upon something you wouldn’t have found by searching.
Pixabay
No matter what your blog post is about, you’re bound to find the picture you need on this website. Their inventory is huge, and the best part? A search feature! So rather than scrolling through hundreds of photos hoping for the perfect one, you can just type in a keyword and sort through the ones you actually need. For example, I found the picture below by searching “coffee”. Easy, right? I use this website when I need something super specific because of its efficiency.
Where do you go to find your stock photos?
The post Websites That Offer Free Stock Photos For Your Blog appeared first on The Blogging Brew.
]]>The post How To Run A Successful Reader Survey appeared first on The Blogging Brew.
]]>Last week I recapped my reader survey and talked about all the information I gained from it, which was a ton! It went so much better than I’d anticipated, thanks to a few guidelines I made for myself before running it. Today I want to share those guidelines with you, and show you how to create a survey from start to finish. By the end of this post, you’ll have all the knowledge you need to run your own successful reader survey!
1. Determine what you want to get out of your survey
Running a survey without much intention won’t provide you with much information, which is why it’s important that you know why you’re making one. Do you want to discover who your audience is? Did you launch a new design and need some feedback? Are you considering making some changes and want to know how your audience will handle them? I ran my survey to figure out what my audience enjoyed about my content, and determine how they were finding that content. Knowing your purpose will help you come up with questions for the next step!
2. Come up with specific questions
Part of the reason I think my survey went so well was because of the questions I asked. I knew what I needed to know, so I asked exactly those questions rather than broad ones. For example, if you want to know whether your readers enjoy your content, don’t ask, “Do you enjoy reading my content?” Instead, ask something like, “What types of content do you enjoy reading the most?” and list out the different topics you post about so your readers can choose. The main point is, avoid asking yes or no questions wherever possible. Your readers have answers, so let them give them to you!
3. Order your questions so they flow well
You don’t want your readers feeling confused when they go through your survey, so making sure your questions flow is important. For example, if you have multiple questions about your content, group all of those together. I also grouped all of my short answer questions together and placed them at the bottom, so it doesn’t look like I’m asking my reader for a whole essay!
4. Create your survey
Now comes the fun part! You have multiple options when deciding where you want to host your survey, but I personally like Google Forms the most. It has an easy to use format, and lots of designs to choose from. My favorite feature is the spreadsheet they create with all of your responses, making it easy for you to see how the survey is going and get a quick glance at what people are saying.
5. Launch your survey
Once you’ve finished making your survey, it’s time to launch it! I launched mine through a blog post, where I explained why I was running the survey and what I was hoping to get out of it. This is also the time to put your social media skills to the test and spread the word. Tweet it, pin it, and share it everywhere! Here are some extra tips for making your launch successful:
- Create a sense of urgency. You want your followers to complete it sooner than later, so by setting a deadline (say 3 days), you’ll get more responses.
- Don’t just tell people to complete it. Tell them why you’re doing this, and give them a good reason to decide on their own that they want to participate.
- Include an incentive if you think your efforts aren’t working. Maybe send a freebie to everyone who participates!
6. Collect and interpret your data
After your determined time period is over, take some time to look at your responses and analyze them. Are there any trends? Surprises? Make a list of these notes. Hopefully they gave you the information you were looking for!
7. (Optional) Create a graphical display and share the results with your readers
Have some fun and put the data you got into a beautiful infographic. This will make it easy for your readers to see how your survey went, and gives you something to look back on! I decided to post about my results too, but that’s totally optional.
If you have more questions, feel free to Tweet at me or comment below!
The post How To Run A Successful Reader Survey appeared first on The Blogging Brew.
]]>The post Reader Survey Results appeared first on The Blogging Brew.
]]>Before I jump into this post, I want to say thank you to everyone who participated in my survey! You have no idea how much your answers helped me in putting the final touches on this blog, and narrowing down my focus for the content I create. I loved all of the notes many of you left too, which just reminded me of how fantastic my readers are!
I asked a total of 15 questions, but rather than talking about all of the answers I received, I want to focus on a few key questions that gave me the most interesting results. And just for clarification, the survey itself was made before I switched my blog name to The Blogging Brew, so I’ll be subbing it in to make things simpler!
What blogging platform do you use?
Over the past few weeks, I’ve seen at least ten of my favorite bloggers make the switch from Blogger to WordPress, and if it wasn’t the trend last year, it definitely is now. These results were about the percentages I expected, which I’m actually happy to see because it means I can continue posting Blogger tutorials knowing I have an audience for them.
Where do you hear about new posts on The Blogging Brew from?
While I had a feeling Bloglovin’ and Pinterest would be up there, I didn’t expect direct URL’s to be such a popular choice. I had a lot of readers tell me that they usually visit my site on their own accord, which was crazy to hear! I’m not sure why I was so surprised though, because there are a good chunk of blogs that I do the same for. Twitter ended up at the bottom of this list, so I plan on putting more focus into promoting on that platform and connecting with my followers.
How long have you been reading The Blogging Brew for?
I started my blog less than a year ago, so I didn’t have much room to work with for this question, but that did allow me to be more specific in my answer choices. It looks like I have a diverse group of readers, as the results ended up fairly even across the board. I loved seeing that almost a quarter of my readers have stuck with me for such a large period of my blog’s journey! It’s also great to note that another quarter of my readers are relatively new, which will hopefully set me up for continuous growth.
Which types of topics do you enjoy reading?
These were probably the best results I received, because they reassured me in the path I’m heading on with this blog. Almost everyone selected “blog tutorials” or “blogging tips”, and a lot of the extra comments I received touched on those as well. I guess The Blogging Brew was a good choice! One thing I didn’t expect to see was the large percentage of readers who selected “personal posts”. I’ve always felt like I struggle to create that type of content, so I thought it would be towards the bottom, but it ended up second overall! Because of that, I’m making an effort to create more personal content and let my readers get to know me more outside of my typical blogging tutorials.
How old are you?
I’m not going to lie, for basically the entirety of my blogging career, I’ve felt like a child amidst a community of moms and soon-to-be moms. I normally don’t think twice about it, until I make a post about my first year college and see my favorite bloggers debuting posts about their toddler’s birthday. That said, I was kind of shocked to see that so many of my readers are in my age group! That just made me realize that I need to connect more with my followers through outlets other than the Facebook communities I’m in, because there are a ton of you out there who I just don’t know about yet!
Do you own a business?
This was kind of a wild card question thrown in out of pure curiosity. With my plans to start a business later this year, I was interested in seeing how much of my audience has delved into that field, and it looks like y’all are loving the entrepreneurial life! Over 30% of you already own a business, and over half said that you’re either interested in starting one or are in the process of making one. It makes me so happy knowing how many of you are tapping into the creative business world, and I can’t wait to join in!
Keep an eye out for a post next week on creating your own reader survey and getting the results you want!
The post Reader Survey Results appeared first on The Blogging Brew.
]]>The post Launch Day! appeared first on The Blogging Brew.
]]>I was going to wait until tomorrow to do this, but I couldn’t contain the excitement anymore. I’ve been hyping up this “big change” for a while now, and well, if you haven’t figured it out yet…
!!!!!!!
Be prepared for an excessive use of exclamation points, because they basically sum up my mood right now.
Rather than writing out a huge explanation for all this, I’m just going to answer a few questions that’ll hopefully sum up this switch. Yes, I’m self-interviewing.
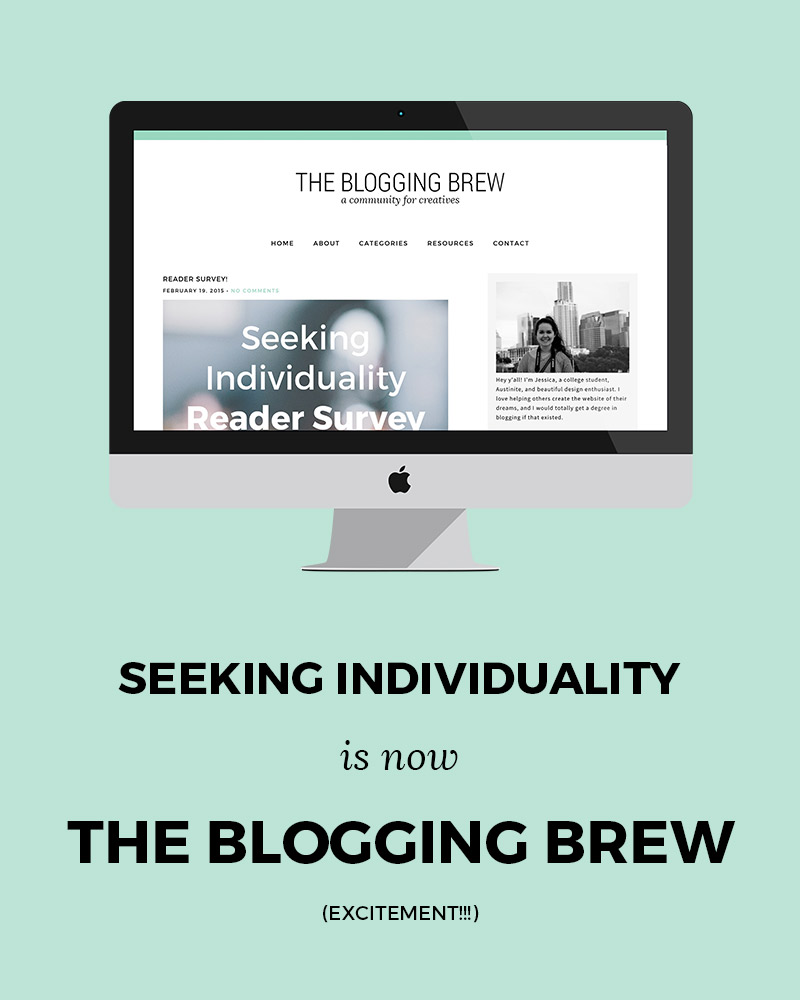
Why did you change your blog name?
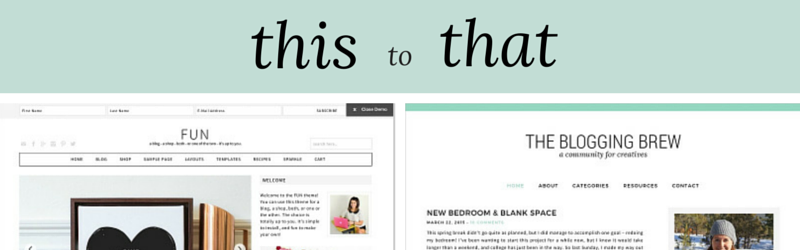
When I first started my blog, I was absolutely set on making it…a DIY blog. And that lasted for about 2 weeks. I also had some intentions in posting about my life, and sharing about my efforts to be unique, hence Seeking Individuality. I had a lot of success in that category for a while, but as I settled into blogging and started branching out into new subjects, I realized what I really enjoy doining—helping people build beautiful blogs, and empowering them with the knowledge to keep growing. Seeking Individuality just didn’t fit with the goals I have for this blog, so I knew that changing it was a priority in my switch to WordPress.
How did you come up with The Blogging Brew?
If you’ve been following me, you probably saw my post a few weeks ago about my epiphany of sorts. I’d been thinking about what to call this blog for weeks, which was honestly the only thing keeping me from making the switch. One day, I was practicing yoga in my dorm, and it just hit me. I started freaking out and texting a few close friends, and they all assured me that it was the right choice. While I had originally considered using my own name, I decided that a) it wouldn’t embrace my intentions with this blog as much as I wanted it to, and b) (the real reason) it wasn’t worth spending over $800 to purchase it.
I guess it wasn’t completely random though. I knew that I wanted the name and design to be three things: welcoming, simple, and professional. The Blogging Brew is supposed to be a take on coffee shop names, because to me, coffee shops are associated with warmth, good vibes, and community. That’s where the tagline, “A Community For Creatives” came from. I want this blog to be a place where all creatives, from bloggers to designers to entrepreneurs, can come to for resources and inspiration. And I truly hope that’s what it becomes!
For those of you that enjoy my lifestyle posts, don’t worry—I’ll still be making those! I’m hoping that now that this relaunch is finished, I can focus on creating better content and exploring personal posts a bit more.
Why did you switch to WordPress?
I was in a huge debate with myself for a while about this decision. Part of me felt like Blogger was enough, and I couldn’t imagine that I needed anything more. After talking to a few blog friends though, I realized the investment would be worth it. Boy am I glad I did it! There are so many opportunities with WordPress, and with my heart set on starting a design business this year (that’ll be the next big project!), being able to design on two platforms will give me a huge advantage. I’ll be making a few posts about my switch and everything that came with it, because I have to admit, that was stressful and I don’t wish that stress upon any of you. I completely understand now why people are willing to pay for someone to make the switch for them, because had I not understood the coding languages or backend terms, I’m pretty sure I would’ve destroyed this site.
Now I’m really hoping this switch worked seamlessly, but considering I did this off googling tutorials alone, there may be a few bugs. That being said, I would absolutely appreciate any comments if you notice something isn’t quite right! One thing I’ll make note of—none of my old comments are on here because I was too lazy to switch them over by hand. I may do it eventually, but it’s 3am and I really just want to launch this dang blog.
Thank y’all for supporting me through this process, and I hope you enjoy these changes as much as I do!
xoxo, Jess
The post Launch Day! appeared first on The Blogging Brew.
]]>The post 7 Resources For Tracking Your Social Media Presence appeared first on The Blogging Brew.
]]>When I think about social media, I like to imagine little messengers going out and telling everyone about my new post. Every time someone finds out about it, they share it with someone else, who then share’s it with another person, and so on. Social media seems so simple, but it’s kind of crazy to think about how many eyes could end up on your content just by posting about it outside of your blog. Take Pinterest for example. A few people initially pin your post, then their friends see it and pin it as well, and then their friends see it and pin it too, and if you’re lucky, that process will continue for a long time. Soon enough, you’ve got yourself a viral pin that will bring in readers for years to come. But how do you know which techniques are working, and benefitting your blog in the long run?
As my following has grown, it’s become a lot easier to keep track of my social media presence. More posts means more sharing, which means more data to go off of. I’ve also bookmarked my fair share of resources that are really helpful in this process, and today I want to share those with you!
ShareTally
I heard about this website a few weeks ago, and I can’t believe I hadn’t found it before. You input a url to a specific post, and it scans all the shares that post has gotten on 21 different social media platforms. It’s super specific too, getting down to the number of likes vs. shares vs. comments on Facebook. I love using this website to see the long term popularity of a post. I check it every once in a while and compare the number to see if an old post is still getting shared around, which is always a good thing!
Twitter Analytics
Twitter tracks a lot about the tweets you make, so why not take advantage of that! The engagement rate (the number of users who engaged with your tweet divided by the number of users who saw it) is a great way to see which tweets capture your audience’s attention the best. You might begin to see a trend between high engagement rates and a certain aspect of your tweets, like an added picture or the use of hashtags. The graph is also an awesome visual tool for seeing which days your tweets do the best.
Pinterest Analytics
Pinterest also came out with an analytics tool, and it’s probably one of my favorite resources. They track traditional data like profile views and repins, but they also include a section tailored to tracking pins from your website (if you have that hooked up to your Pinterest account). I LOVE this feature, because I can see which posts are doing the best, which images may need improving, and which pins are staying popular in the long term. Without this tool, I never would’ve known that my college shopping list post from last year got over 100 repins! That might not be a lot in the big blogging world, but anything over like, 10, is a huge accomplishment for me.
Pin Plugin
This tool isn’t as detailed as Pinterest analytics, but it gives you a quick look at how well a post did on Pinterest by gathering the total number of pins made from a specific post. If you don’t feel like digging through the traditional analytics system, this tool is perfect for you!
Iconosquare
This is my central hub for Instagram statistics. Along with its beautiful interface, it has all the stats you could possibly want to know about your Instagram. You can even track your follower count, which could be really helpful during giveaway times if you added your Instagram URL to one!
Bitly
Most people see this solely as a way to create short URL’s, but it has a great statistics tool too! If you create an account, you’ll get a feed of all the links you create and some data about their performance. You can see how many total clicks the link got, as well as the number of clicks made on each social media platform. This might help you rethink your link placement strategies if one platform isn’t doing as well as others.
Pinterest Source Page
I know, lots of Pinterest, but this platform has proven to be the most helpful for my blog, so I track it the most! I had no idea this page existed, but it’s pretty fantastic. It compiles all of the pins made from your website, making it a great visual representation of how popular a post is. Just add your blog’s URL to the end of it so you can see pins from your website.
p.s. : 6 Tips For Growing Your Blog With Twitter + Using Pinterest Boards To Organize Your Life
The post 7 Resources For Tracking Your Social Media Presence appeared first on The Blogging Brew.
]]>The post Big Changes Are Coming! appeared first on The Blogging Brew.
]]>Do you ever have one of those days when everything just starts coming together? As if right before your eyes, all the thoughts flooding your mind somehow connect and, well, make sense? That was me yesterday. And it was beautiful.
Yesterday was huge. I’ve been thinking a lot about this blog recently, and my future hopes for it as well as myself. My laptop is cluttered with lists of new ideas, hopeful dreams, and a million things I need to do to accomplish those. But those millions of things started coming together. And it was beautiful.
I was practicing yoga, telling myself, “STOP THINKING, JUST RELAX,” which worked…for about ten seconds. I can only go so long without my mind wandering off and thinking about what to do next. What could I be filling this time with? What can I do now that will make me a happier/better/more successful person tomorrow? So I started thinking about something that’s been nagging at me for weeks. Something that I feel like most bloggers would understand, because they’ve all been through this frustrating time. And finally, it hit me. And it. Was. Beautiful.
But I can’t tell you about it. It’s just that big.
All I’ll say is that big changes are coming for Seeking Individuality, and I think y’all are going to love them. I don’t exactly know when they’ll be happening, but my hope is by the beginning of summer. Whether that be a month from now, or June 21st, depends on how smoothly these changes go. I have a huge feat ahead of me, but I’m beyond excited to begin this journey!
Until then, I’ll be running Seeking Individuality as normal, and I have a ton of new content ideas to roll out. Thank y’all for supporting me and this blog over the past few months, it means the world to me!
Hint #1 – Let’s just say, coffee is brewing…#EEEEEP
The post Big Changes Are Coming! appeared first on The Blogging Brew.
]]>